

The Sury Process
Essay by Simone Simoncini
Introduction
A few months ago, I started finger painting with pastels on some scrap palladium and gum prints I had made. I found it difficult to get a decent amount of pigment where I wanted it to be unless I sprayed with a fixative and reworked on top. Doable, but not ideal.
I began wondering ‘How could it be possible to create a textured roughness to the surface of the print in order to accept more pigment and to ease the process of painting?’.
It was by chance that I stumbled across a process which has been almost forgotten named Sury. Only a few resources were available and only three or four images of prints made by modern artists or researchers.
As the information I received indicated that the process had been patented in the nineteen twenties, I used Google Patents to search it and downloaded the American patent that Joseph Sury filed in 1926. Later I also bought a French pamphlet on the process.
Philippe Berger “Formule de la soluzion par Sury en 1924 pour la fabrication de son papier “color development”
https://philippeberger.net/fr/page-9716-livre-procede-sury-aux-poudres
The Sury process is based upon making a porous matrix specifically engineered to accept pigment when dry, it was a perfect way to achieve my goal! Most of the (few) examples available online are monochromatic, making the method of the Sury process interesting from a historical point of view. However, I did not see why the matrix could not have been treated like any other basic layer to finger paint on. Despite the described method to make a color photograph with the Sury process awkward in practice, using the RGB separation approach seemed to me stimulating as a notion.
This paper is not about the history of the process or its importance in the history of photography, which is not my primary interest. Nor is about the reproduction of the original technique to renew its memory. For those interested in the historical background, valuable information can be acquired from the researcher(s) that studied in-depth history of the process. My essay is about the how-to make a Sury print to create artwork, reviving a smart way to lay down a photographic image while leaving the artist to literally paint it using his/her creativity. This essay is based only on my personal work as there is little information available on the public domain.
The Basic Principle
The Sury process was developed as one of the first attempts to make color photographs before chromogenic emulsions had been made available.
The principle is to make a matrix on the papers surface which is later “dusted” with colored pigment. The matrix is made up of colloid, hardening agent, inert material and ultramarine blue pigment. This is exposed, using a negative.
As the patent explains, this mix sports some interesting features. On a microscopic scale, the inert material and the ultramarine blue are side by side like micro-pillars inside the colloid. The ultramarine blue is a sulfosilicate of aluminum that dissolves when in contact with an acid.
Sury eventually discovered that after bleaching in acidified water, the matrix did not collapse, but on the contrary the inert material deprived of the ultramarine would result in a microporous structure.
Il processo Sury è stato sviluppato come uno dei primi tentativi di realizzare fotografie a colori prima che fossero rese disponibili le emulsioni cromogeniche. Il principio è quello di creare una matrice sulla superficie della carta che viene successivamente “spolverata” con pigmenti colorati. La matrice è composta da colloide, agente indurente, materiale inerte e pigmento blu oltremare. Questo è esposto, usando un negativo. Come spiega il brevetto, questo mix ha alcune caratteristiche interessanti. Su una scala microscopica, il materiale inerte e il blu oltremare sono affiancati come micro-pilastri all’interno del colloide. Il blu oltremare è un solfosilicato di alluminio che si dissolve a contatto con un acido. Sury alla fine scoprì che dopo lo sbiancamento in acqua acidificata, la matrice non collassava, ma al contrario il materiale inerte privato dell’ultramarina avrebbe prodotto una struttura microporosa.
Once dried, the microporous matrix shows a pale brownish image made up of gum Arabic (or the colloid in use) and the inert material.
At this point, the only remaining step is to “dust” the matrix with pigment or to paint it with oil paint. The underlying logic, in both cases, is to let the pigment sink in those micro holes in the matrix.
The dusting phase consists of building up densities in the areas where one wants the pigment to be. I usually begin with a brush trying to get a first weak layer of pigment. In the time lapse video linked below you can get an overview of how the phase is carried on by the author. The video refers to the version number 3 of the image examples below.
The process is quite work intensive. In my experience, a 20×24” matrix can be dusted in three to five hours, depending on how detailed one wants the print to be.
The process is well suited to create full color images of a distinct painterly appearance.
Una volta essiccata, la matrice microporosa mostra un’immagine pallida brunastra composta da gomma arabica (o colloide in uso) e materiale inerte.
A questo punto, l’unico passo rimanente è quello di “spolverare” la matrice con pigmento o dipingerla con pittura ad olio. La logica di fondo, in entrambi i casi, è quella di far affondare il pigmento in quei micro fori nella matrice.
La fase di spolveratura consiste nel costruire densità nelle aree in cui si desidera che il pigmento sia. Di solito inizio con un pennello che cerca di ottenere un primo strato debole di pigmento. Nel video time lapse collegato di seguito è possibile ottenere una panoramica di come la fase viene eseguita dall’autore. Il video si riferisce al numero di versione 3 degli esempi di immagine di seguito.
Il processo richiede molto lavoro. Nella mia esperienza, una matrice 20×24 “può essere spolverata in 3-5 ore, a seconda di quanto si desideri che la stampa sia dettagliata.
Il processo è adatto per creare immagini a colori di un aspetto pittorico distinto.
Key Factors of Success:
- Keep in mind at every stage of the process that pigment laying is far easier than pigment removal
- The surface of the paper must be shiny, so a hard-sized paper is a must, otherwise one gets dirty highlights
- Brushes can be used to dust pigment in using the tip of the bristles, and remove it by brushing as in painting
- Deeper sinking of pigment in matrix is done by finger-smudging the pigment in
- Gently caressing the print with your hand/fingers with a hint of dark pigment of a darker color immediately creates contrast
- Soft erasers work best with dry pigment to clean highlights
- Work from lighter colors toward darkest ones
- In color, don’t be too hasty to build contrast with dark pigments
- Lamp black or graphite black can be used in final touches to get the desired contrast, always working very carefully, as black pigment can darken the whole thing to a much deeper tone than expected
- Keep in mind that fixative and, eventually, varnish will darken the print even further
The Recipe
I personally use one part of a 10% solution of ammonium or potassium bichromate mixed to two point five parts of gum Arabic.
Let’s say 10 ml 10% Bi chromate to 25 ml of gum. Then I add 10% of the total weight (gum + sensitizer, in this case 35ml so roughly 10% of 35ml = 3,5 gr) of blue ultramarine and another 10% of inert material, either kaolin or fine pumice powder.
The original patent does not use pumice, while it does speak of kaolin (white clay) and barium sulfate (which is also used for baryta papers. I guess any kind of inert material, preferably white, will do the job. The main difference among them is how smooth or coarse the matrix will come out. This, in turn, will affect the matrix’s intake of the pigment
Single Layer vs Multilayer Matrix
While a print will usually be made with a single layer matrix, there is no drawback in making a multilayer matrix. The reason to consider creating a multilayered matrix is mainly related to contrast control and fine detailing of the picture.
I found that coarser inert materials are most suitable for putting pigment in large areas because the resulting matrix is capable of taking more pigment, while if you want to have a fine detailed print a finer powder like kaolin is to be preferred.
My approach is to make a first layer using the mix above with pumice for the shadows, and then make a second layer (obviously with pin registration) for a lower contrast mix with kaolin. (Let’s say one part bichromate to one point five of gum Arabic along with the same 10% of ultramarine blue and kaolin).
I try to make this second layer thin, so to have all the details revealed.
Of course you can adjust exp time for the second layer, but it’s not critical.
The only thing you want to avoid when you create the matrix is to block any area of the image where you want it to show details, because blocking it will prevent further detailing. Doing the opposite (a light matrix) may prevent the print from reaching a very deep dark tone, but as long as the image is shown, adjustments can be easily made by varying the hue and darkness of pigments at time of “dusting”.
L’unica cosa che vuoi evitare quando crei la matrice è bloccare qualsiasi area dell’immagine in cui vuoi che mostri i dettagli, perché bloccarla impedirà ulteriori dettagli. Fare il contrario (una matrice di luce) può impedire alla stampa di raggiungere un tono scuro molto profondo, ma finché l’immagine viene mostrata, le regolazioni possono essere facilmente fatte variando la tonalità e l’oscurità dei pigmenti al momento della “spolverata”.
The Negative
I use the same negative setup that I have developed for gum. In this case I personally think that any kind of calibration is really a waste of time, as the degree of freedom allowed by the process is far too great to attempt a standardization of any kind. The matrix will be ok when the author judges that it does contain all the details he/she expect to be in the picture, while darkness/lightness, contrast and so on will be built by the author during the dusting phase. So, to make a long story short, I make a gum negative and print it with the Sury recipe, making multiple layers if needed.
Exposure and Development
Again, same as gum. I tend to overexpose approximately 50% more than gum in this case as I find it easier to work the matrix in development using a spray. The presence of the inert material must have some effect on the degree of cohesion of the exposed gum, as it is usually surprisingly resistant to still development while easily workable with a water spray. Usually I let the matrix soak face down for ten minutes or so before spraying it.
Combining Techniques
Keeping in mind that by hand painting with pigment one can obtain either a fully colored picture or a monochromatic one in pretty much the same way, some combination of techniques can help the artist in reaching his/her vision.
I have only tried printing a basic layer of gum with some yellow and metallic gold pigment because I wanted the foliage in picture A to retain an impression of the light shining through. That said, I do not see why other techniques could not blend in the mix. For example, that a cyano layer would give a dreamy background while a tricolor gum print would acquire a painting appearance and “feel” when overprinted with the Sury matrix.
Examples
The three versions below have been made from the same negative. Underneath you will find a description on how the process has been done and good and bad points of the corresponding image.

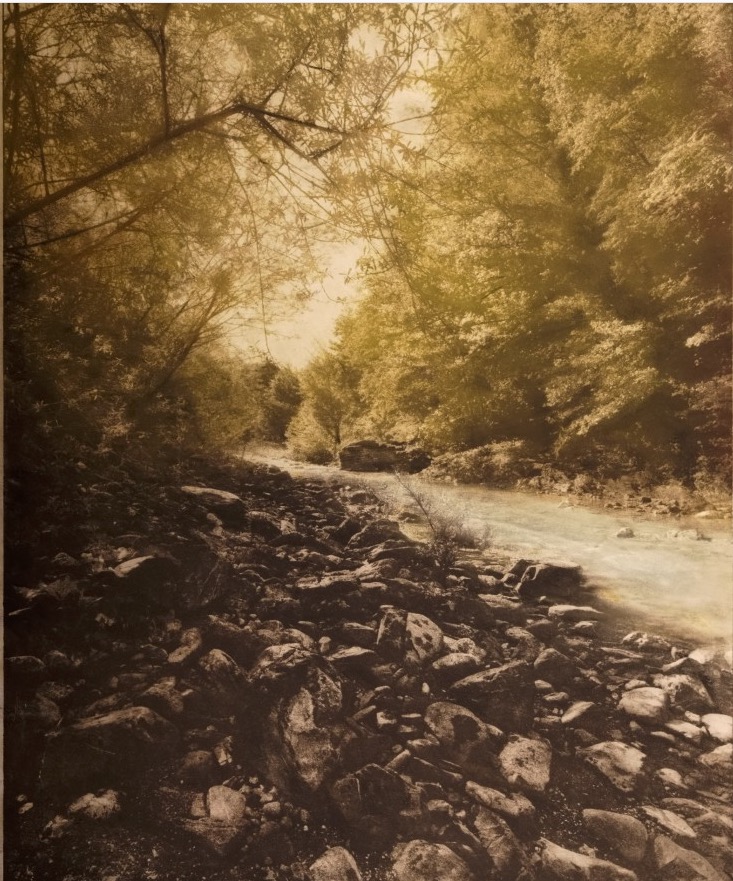
Strangely, the first version of the image was the most satisfactory for this body of work and was selected for the MIA 2019 Exhibition in Milan. For this one the matrix was elaborate. Firstly, I made a layer of weak primary yellow and gold pigment as one would for normal gum printing. The idea was to give the image a luminous background, to be kept in the highlights of the picture and hidden by darker pigments in the shadows. Then I printed a matrix consisting of two layers. First layer 1part bichromate to 2 parts of gum plus ultramarine and pumice. Second layer same bichromate to gum ratio, but half dose of ultramarine and using kaolin as inert. The idea was to add a detailed layer of matrix to paint in the finest details. I have been using mostly yellows and greens on the top section, indigo for the river and a mix of burnt sienna of various degree of darkness in the Sennelier pastels’ palette for the lower part. Final contrast adjustment with lamp black, overall. Paper is Favini Bindakote.
The second version of the image has been made with a single layer of matrix which resulted in a rather contrasty image with fewer details in the highlights. Paper is Favini Bindakote.
The third version of the image has been made with two layers of matrix, similar to the first version but without the yellow /gold layer underneath. Choice of pigments is very similar, with somewhat heavier intervention of the black lamp.
At the end
So the initial question on how to create enough roughness to let the author paint has been answered thoroughly by Mr. J.Sury’s intuition. As the present paper is intended to give the reader basic info on the how-to of this truly intriguing process, I would like to emphasize its inherent flexibility in creating either monochromatic or full color images following the author’s mood and inspiration.
Special thanks to Megan Garth for helping me out from the antipodes revising the paper.
Ziatype beginners kit
Ziatype Ziatype Beginner kit (Kit09) Kit contents Sensitizing: Ammonium Ferric Oxalate sol.A 25ml Ammonium Ferric Oxalate contrast sol.B

Wet plate Collodion-formulating Poe Boy
Collodion process-Poe Boy formula (No ether/No cadmium) The procedure for the collodion “poe boy”, or “poor boy” as some say, is interesting for it does

Wet plate Collodion-Old Work-Horse process
Old Work-Horse for positive process 1°- Collodion solution (part A) pour 220 ml plain collodion into a 500 ml beaker slowly, add 140 ml ether


One Response
Wow – well done – I like the artwork a lot…concratulations – very inspiring and give me a lot to think… thank you for the detailed explanation.